|
|
AAF's Ausf. H/J Inside & Out
Many different countries acquired Pz. Kpfw. IV's during the course of World War II. In some cases these were tanks sold to Germany's allies and sympathizers, and in other cases they were tanks captured by the enemy. Many of their new owners continued to use them in active service and so they circulated among various armies long after the war came to a close. The tank pictured here is one such case.
This panzer was eventually purchased by the Syrian Army. Nobody knows for certain who sold it to the Syrians, but it probably came from Czechoslovakia sometime after being captured there by the Russian Mongols of the Red Army. Many of the Syrian Pz. Kpfw. IV's are said to have originated in France and Spain, so this might be another possibility.
The tank shown here is probably one of those Pz. Kpfw. IV used by Syria during the 1965 Water War with Israel. These tanks were placed in prepared positions on the Golan Heights where they shelled Israeli towns on the plain below. Israel moved Centurions in to counter and a duel broke out. The fighting was stopped by UN intervention before either side could claim victory. Later, on August 12, another exchange occurred. This time the Israelis succeeded in forcing a cease-fire. The surviving Syrian Pz. Kpfw. IV's remained in their positions along the Golan Heights until the 1967 "Six Day War" when they were captured by Israel and placed in storage at the Latrun Museum.
The American Armoured Foundation Tank Museum acquired the panzer by trading an M5 Stuart for it -- what a great deal! The tank's restoration will commence as soon as they finish moving in to their new headquarters. By the way, they're looking for spare parts -- if you know of a source for these then please let me know or use the above link to contact the AAF by way of their web-site - thanks!
These photographs were made possible by the generous efforts of American Armoured Foundation Director Karen Gasser and her staff. Thanks Karen!
|
|
|
|
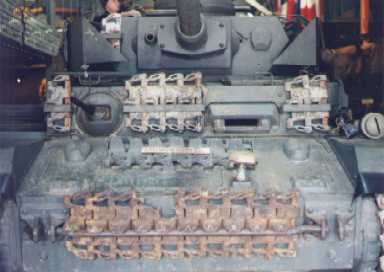
Picture 1
Here's a good view of the tank's front.
The driver sits behind the vision port opposite the bow machine gun. The radio operator doubles as the bow machine gun operator. The loader, gunner, and commander all squeeze into the turret area with the commander in the middle behind the gun and the loader and gunner in front of him and to his right and left respectively.
The word on the street is that, at some point prior to the tank's display in the museum, it was assembled from an Ausf. J turret and an Ausf. H hull. The style of the muzzle brake supports this assertion as it is clearly that of a late model Ausf. J. Also, the ventilator is shaped like the ones found on Ausf. Js.
The commander's hatch, however, features double doors. This is an attribute peculiar to models through early production Ausf. G. After that the commander's hatch had a single door. Unfortunately I lack photographic material that shows the pistol ports and vision slots in the turret side hatches. This would be another clue as to the true identity of the turret as these were welded closed and, later, eliminated altogether during Ausf. J production.
Of course, all this proves little since early and late versions of these components are interchangable and it's hard to say what changes might have been made in the field or during repairs and refitting.
The tank's previous Syrian owners modified the top of its cupola to accomodate thier standard Russian-made anti-aircraft gun. The fronts of the fenders have also been modified.
|
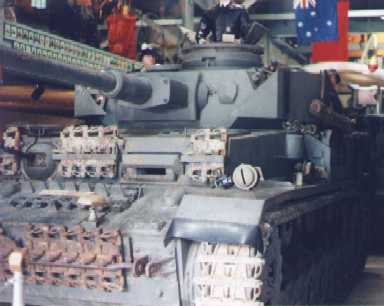
Picture 2
Here's a close-up of the tanks front that affords us a better look at the Notek black-out light mounted on the top of the hull out in front of the driver's visor. Here we can also make out the little rain gutter above the gunner's periscope outlet (located between the main gun and the gunners vision port).
|
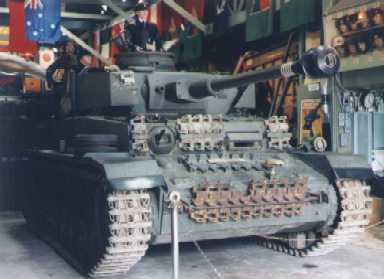
Picture 3
From this angle we see the closed door of the gunner's vision port to the left of the main gun (to your right). If you look carefully you can see the little hole in the ball mounting to the left of the bow machine gun's barrel. The machine gun's sighting optics reside behind this hole. We also get a better look at the driver's vision port. His hatch is in the roof of the hull just above his vision port.
The Ausf. H's sole headlight is seen here, mounted (almost) in the correct position on the left fender. This is the newer style of headlight made by Bosch featuring a metal black-out cover.
|
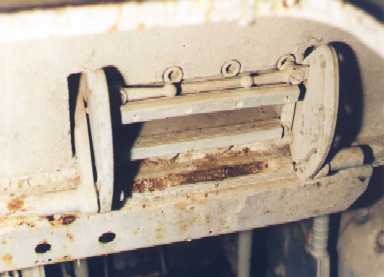
Picture 4
Here we're looking down through the driver's hatch. The ammo stowage bin located behind the driver's seat dominates this picture.
The bracket that's mounted to the front of the bin might be for the driver's fire extinguisher, which is known to be located "beside" his seat. If so, then it would seem that the lower bracket is missing.
Part of the seat's frame is visible in the shadows at the lower left area of the photo.
|
|
|
|
Picture 5
Now you have climbed in and you're sitting in the driver's seat looking straight ahead. The contraption you see before you is the driver's visor, or "window", along with the mechanism that opens and closes the armored shutter located outside. This model of visor, the "Fahrersehklappe 50", was first introduced with the Ausf. F1.
The shutter can be closed to give the driver extra protection. He might then rely on a set of KFF-2 twin periscopes to see the road...or lack thereof! The periscopes would ordinarily peer out through two little holes above the driver's visor. But, starting around January 1943 (late Ausf. G), the periscopes were left out. This is the case here.
It's difficult to make out in this scan, but the original photograph clearly shows the chassis number etched in the metal just under the driver's visor: "85575". This confirms that the chassis was manufactured as an Ausf. H.
Question: Prior to the Ausf. G the driver had at his disposal two blue lights that warned him when the main gun was extended beyond the sides of the hull. Might the two empty holes in the forward panel (under the visor) have been designed to accommodate these lights (even though the lights were left off)?
|
|
Previous Page |
1 |
2 |
3 |
4 |
5 |
6 |
Next Page
|
|